Saturday, December 19, 2009

Pods: Stability on the Move


One of the most dramatic improvements you can make in filming with your camcorder is to have a stable base. The most common and usually the best form of solid base is of course the tripod. However there are many situations where using a tripod is not a feasible option. This is particularly so when you are travelling. In other situations tripods can be inconvenient or even prohibited. Some museums and the like allow videoing but ban tripods. Fortunately, there are a some quick and simple alternatives.

The monopod, is simply a single pole, usually telescopic, to which you connect your camera, much the same way as you would to a normal tripod. It provides a relatively stable base, although there can be some unwanted movement for and aft and side to side.

The stringpod is a piece of string about 1.8m long to which is attached a 3/8" bolt (usually by a small hole drilled across the head of the bolt). The bolt screws into the base of the camcorder, and the operator stands on the trailing end of the string and pulls it up taut. The stringpod provides about the same degree of stability as the monopod. However, the stringpod can be simply rolled up and put in a pocket. It does take a moment to set up with the correct distance between foot and camera.

The bagpod is another very simple solution. The bag itself could be a plastic zip-lock sandwich bag, a cloth bag, or even an old sock (without holes). The bag is filled with almost any dry granular material. This could be sand, sugar, rice, or even soil picked up at the location. When filled the bag makes a small cushion between a solid surface and the camcorder. The solid surface can be flat or vertical. It might be a gatepost, a car bonnet, a tree, a wall, or a light pole. The flexibility of the material allows sufficient movement for the operator to frame the shot. Once framed the camera can be left on horizontal surfaces, but will need to be held against vertical surfaces. Like the stringpod, the bagpod is an excellent solution for travellers, and for less obtrusive or “guerrilla” filming.
...but don’t forget to empty any foodstuffs, sand or soil before travelling between countries or returning to Australia.

Taking Your Video Editing Project on the Road.


This post is based on using Premiere Pro 1.5. However, the principles should apply to most other worthwhile video editing programs.

I was recently asked to show the members of a Premiere Pro Workshop how I made a particular piece of video. To do so, I copied my Premiere project file onto my trusty USB drive, and off I went to the workshop. When I went to open the project on the computer at the workshop, I was asked “Where is file ‘x’?”, then “Where is file ‘y’?”. Without these files, I could not properly edit my project on the computer at the workshop.

In order to understand why these messages were coming, you need to understand the relationship between your project and these missing files.

I like to use the analogy that using a computer to compile a video is like using a kitchen to bake a cake:
You turn on your computer / You enter your kitchen
You open your editing program / You open a recipe
You browse your hard drive and import files such as video clips, still images, music and sound effects / You open your pantry and take out the ingredients
You arrange the assets on the timeline / You mix the ingredients in a bowl
You render your project / You cook the mixture in an oven
You burn your project to DVD or other media / You put your cake on a plate
You show your video / You serve your cake

If you were going to take your cake to Grandma’s house, you’d take it along as a finished cake. However, if you wanted to go to Grandma’s and re-make your cake in her kitchen, you’d take along the recipe and all of the ingredients. If you don’t take the ingredients, you can’t make the cake.

Back in the world of video, my problem was that I did not take along all the ingredients (assets) that went into making the video.

If I took my cake ingredients to Grandma’s I’d probably not take along my pantry and fridge. I’d put the ingredients in a basket and take that. For my video, I’d gather the assets together, and put them on a USB drive, or a CD or data DVD.

Gathering those assets together can be very tedious. While some will be in the folder where you save your project, others couoldbe anywhere on your computer; in sub-folders in places such as “My pictures” or “My Music”.

Fortunately, Premiere Pro can help.

When you have completed your project, or have it at the stage that you want to take it on the road, save your project, then click on Project > Project Manager. The Project Manager dialog box should open:

Under Resulting Project, select Collect files and copy to new location.
Make sure that under Project Destination the path is to the same folder as your project. To make sure all of the assets can fit on the disk space available, and onto your USB drive, CD or data DVD, click on Calculate under Disk Space. If it will fit, Click OK.

All of the “asset” files will then be copied to the same folder as your project.
Copy the entire folder to your USB drive or burn it to CD or DVD.
As long as a compatible version of Premiere Pro is running, you should be able to open and work on your project on another computer.

PS: Do not eat your cake while editing…the crumbs are not good for the keyboard.


Thursday, December 17, 2009

Voice Over for Video

How often have you sat through someone else’s video that was well shot, well edited, good story, but ruined by a dull, flat voice-over.

If we are honest that thought might also apply to our own.

The truth is that we are not likely to have been gifted with the "Voice of God" and aspire to a career in voicing movie trailers, or even commercials for book warehouses.

However, there are a few things we can do to make ourselves easier to listen to, and our videos more watchable.

Firstly, let's start when we are shooting our footage on location. Rule No 1 is don’t shoot short. Give yourself plenty of time in each shot to play with later.
Rule No 2 is shoot plenty of ambient footage and sound. By ambient footage I mean shots of things around you which in themselves are not spectacular, but provide additional background and cutaways to match your narrations.

If you are tempted to narrate footage while you shoot, by all means do so, but take the same shot again without the narration. Good Ad lib narrations from behind a camera are invariably hard to achieve. Don't forget that you are also likely to pick up many unwanted sounds, wind noise, and even your own breathing. Your on-camera narration may however help you later in writing your script.

Once you have viewed your footage and completed your additional research, you can envisage your final video, and start to write the script.

In writing your script, it is important that you visualize an individual who is to be your audience. This could be a friend, or maybe a grandchild. You are going to tell them the story of your video. It might be about your last trip away, or it might be your family’s history. In any case, make your script a conversation with that one person.

I write my scripts in paragraphs, but print them as single and alone sentences. I’ll explain why later.

Whether you stand or sit to read your script is up to you. To gain realism in presenting a conversation you might like to consider standing and using hand gestures to emphasis points. Invisible though these will be, they will help you to add emphasis to your voice.

It is important to keep your voice lubricated, so have a glass of water at hand. Do not think about you breathing. Let it happen naturally.

Unless you are delivering a particularly somber sentence, smile; even for the most mundane of lines. Your smile will give your voice animation. Similarly, be excited. What you are doing is important, and you need some excitement and emotion in your voice to convey the message.

Watch your diction. Concentrate on delivering your words clearly, and emphasis the d’s and t’s that come at the end of words. These are the easiest to let slide away.

Listen to the pace of your speech. Look for a rhythm that suits the words, and maintain it.

Use pitch to give highs and lows to your reading, but always start a sentence at a high pitch. It grabs attentions and you can move down and up from there. It is almost impossible to credibly move from a low pitch start to higher pitch later.

For the read itself, I record one long read, including the setting up noises and so on. I read each sentence three times, even if I think I nailed it the first time. Sometimes you think you have, when you really haven’t. By making three reads, I know to expect to see the sentence three times in editing. If I feel I need more than three reads, I’ll make a mark on the script to tell me how many reads there are for that sentence.

In editing, I use Audacity to listen to my three (or more) readings of a sentence, and to cut out the unwanted sentences and noises. Where sentences are to follow on in a paragraph, I allow for a small gap. For paragraphs, I leave the gaps larger. Theses gaps might be shortened or lengthened when go to the video timeline.

Before saving my soundtrack file, I normalize the whole track so that volume levels are more or less consistent. I then save this as a new file. I may want to go back and extract something else from the original.


Using Stills in Video

In videos we often find one or more stills interspersed with video footage. In some cases, such as historical photos or portraits of people, this can be acceptable. However more often than not, a single contemporary still of say a building in the midst of a travelogue can be very jarring.

While the use of a “Ken Burns” effect to animate the still (pan and/or zoom) may help to minimise this problem, the image usually remains recognisable as a still. Here are two techniques that might just trick most people into seeing footage when they are in fact looking at a still. These techniques work best where the subject of the still is outdoors and static (eg a building or landscape) without any apparent “frozen action”.
They also work better when used in a short rather than long clip.

The techniques are based on using Premiere Pro and Photoshop Elements, but should work equally as well in programs with similar capacities.

The first technique involves superimposing footage of moving foliage to one upper corner of the frame.

Shoot some overhanging foliage (with some movement) against a uniformly coloured sky. Frame the shot so that the foliage appears in only one or other upper corner of the frame.
In Premier, Place the foliage footage on track 2 of the timeline.
If there are variations in the sky behind the foliage (eg clouds), or any other objects appear on the screen, use a four (or more) point garbage matte to isolate the foliage and the immediate area around it.
Open the RGB Difference Key.
Place the eye-dropper over the sky area next to the foliage and click.
Slide the Similarity Slider back until the sky disappears and only the foliage is visible.
Place the main still image on Track one and scale to fit.

In playing the clip, the still should be framed by the slightly moving foliage.

The second technique involves replacing the still sky with a sky with moving clouds.

Take a photograph of the sky (with clouds) and save to the computer.
Open the main still image in Photoshop.
Using the selection tools, select and isolate the sky.*
Click on Select/Inverse to select the non-sky area of the image.
Copy the image.
Open a new blank file (with a transparent background).
Paste the image. The image will appear with the sky area “chequer-boarded” out.
Save the image as a Photoshop file.
In Premier import this file and place on track 2 of the timeline, and scale to fit.
Import the sky image and place on track 1 of the timeline.
Scale the image to be about 15% larger than the screen.
Using keyframes, animate the image so that it slowly moves horizontally across the screen.
If necessary, adjust the colour and lighting of one or both tracks so that they “match”.

The main still image should appear with moving clouds above/behind it

*Some knowledge of selection techniques in Photoshop is assumed.

My Friend, Chroma Key.

I was recently helping a friend make a family history video. He had written an introductory piece that he wanted to deliver to camera outside an old country pub once owned by his forbears. This seemed very straightforward. I hooked up a lavelier (lapel) mike to the camera and positioned him with the pub in the background. It started well until the nearby ice machine cranked up. We then moved across the road and started again. This time the sound of a chainsaw from a neighbouring property rent the air. It was time to take a break. After peace was restored we battled on pausing for passing tractors and other farm machinery, and the odd car.

Like most of us, my “talent” was also having trouble remembering more than a about one paragraph at a time. “Not too worry,” I thought, “I’ll insert cutaways to old photos and other footage to cover these breaks”. However, it was a partially cloudy day and the light kept changing by the second. Even within the shorter takes, the change in lighting was very noticeable. Not only that, but every time the sun appeared my talent squinted his eyes. Thankfully we did not also have to contend with people moving around in the background, aircraft flying overhead, or that other great bane of videographers, wind. Nonetheless, back in the editing suite, I had the Devil’s own job of making something useable out of it all.
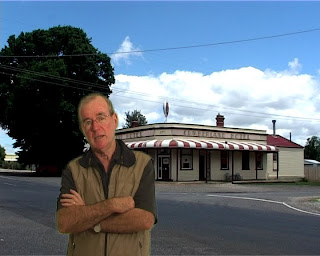
Fortunately, I had taken some long shots of the old pub without people in them. So we decided to try again using chroma-key. I erected my green screen sheet in my family room-come-studio and had my talent re-do his introduction. In only two or three takes we had it down pat and in the can. The lighting was better and so was the sound. Fortunately, no extraneous motor mowers were going in the neighbourhood. My talent was more relaxed and natural. With a bit of a fiddle in Premiere Pro, and the judicious use of cutaways, I am confident that we will get away with it.

So, if you are making a documentary or perhaps a video about your holiday travels, you might like to try using chroma key. However, there are some points to remember. These relate to both shooting the location footage, and to filming the presentation.

Avoid using stills as background, especially if they have people, water, trees or vehicles in them. The audience will be looking for these to move. If you are shooting location footage with a view to using as a chroma key background, make sure your camera is rock solid by using a tripod or otherwise securing your camera. Do not pan, tilt or zoom. Use a long shot rather than a wide shot. Record the shot for at least as long as think your talent might be speaking in front of it. You might get away with extending the clip by slowing it down in editing, but not if there are people or moving vehicles in it. Shoot plenty of other footage around the location. These will be used as cutaways from the “to camera” presentation.

In setting up your “studio” to shoot the presentation, make sure you have plenty of room; at least 5 metres from camera to green screen. Your green screen should be as flat and as dull as possible. I have used the green screen provided with Pinnacle Studio 11, and it works extremely well. If the screen has sharp creases, iron them out before use. Creases can show up as colour variations and may be impossible to remove in editing. Secure the screen at at least three points across the top and three points across the bottom and ensure that it is quite taut. The top of the screen should be about two metres above the floor.

You should light the green screen separately from your talent. I used two work-lights placed on chairs to each side of the screen and about 1.8 metres out from the screen. The chairs had solid backs that prevented these lights spilling directly on to my talent. Spilt light like this could cause highlights on the talent’s shoulders and hair that can make it difficult for the editing program to separate cleanly from the background.

The talent should be placed about the two metres out from the screen so that he or she is seen from the camera against the green background from head to waist height. In lighting my talent, I used a modified* work-light, bounced from the ceiling. This light was placed to one side of the camera. While not pure studio lighting, it was more credible as outdoor lighting. In all cases you will need to ensure that no shadows from the talent are visible on the green screen.

The camera was placed about 3 metres in front of the talent and the shot was framed with a medium zoom so that the background was visible all around the talent. Placing the camera too close makes it harder to ensure that sufficient green screen is visible around the talent. A medium zoom is also favoured by portrait photographers; it provides a more natural and less distorted picture of the face.

Do not be overly worried if the green screen does not fully fill the frame. The extraneous backgrounds can be removed in editing.

Having recorded the presentation, it is time to hit the editing suite. The following is based on using Premiere Pro, but the principles should apply to any good editing product.
Place the presentation footage on track 2.
Edit the footage so that the presentation flows smoothly.
Place the location footage on track 1.
Lower the volume on the location audio track.
In the first presentation clip on track 2, resize and re-position the talent against the location. You can temporarily reduce the opacity so as to see the background through the clip (don’t forget to return to full opacity once this is done).
Apply the green-screen key to the first clip on track 2.
Adjust the controls until the green background disappears.
Use a garbage matte to remove any other extraneous background images.
The talent should now appear in front of the location footage.
Adjust the lighting and colour of the talent to blend with the location footage.
Copy the first clip on track 2
Highlight the remaining clips on track 2 and “paste attributes”.
Place your cutaway clips on track 3, trimming and positioning as you go. These clips should be placed to cover any cuts between clips on track 2, and/or to illustrate any particular references made in the presentation.

If you can master these techniques, you will find that you can add extra dimensions to your videos, and you can make presentations to camera with more control, in less time, and without having to make a goose of yourself in public.

*I used an angle grinder to “soften” the glass lens of the work-lights.